

For more info on servers, click the More Info button.
|
Warning: Before following these instructions please note that running server software on your computer without a clear understanding of what you are doing may seriously harm your system and lead to vulnerabilities.
Regardless of which operating you have, you must first download the server software from the Minecraft Downloads Page and save to where you wish to keep your server files. It is recommended that you save the server software if a folder named "Server" because once you run the program it will place a lot of files in that area!) |
Java 7 must be installed in order for you to host a server !!

Setting up a Free server
What You Will Need:
-
The Minecraft server file from minecraft.net (.exe or .jar)
-
Your iPV4 address and default gateway (*)
-
Your admin password for your router (*)
* If you don't know how to get these, they are explain in the tutorial.

Time To Get Started !
-
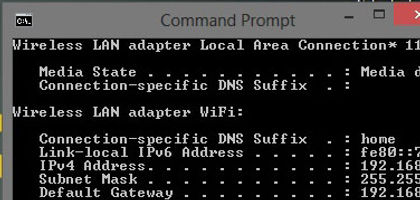
The first thing your going to need to do is to get your iPV4 address and your default gateway. If you know how to do this or you have it already you can move to Step 2. Ok so your going to need to open your Command Prompt and type in ipconfig. You should then see something similar to the screenshot.
If you are using a Mac, you need to go to System Preferences > Network > Advanced > TCP/IP.
Make sure you note down the iPv4 address and the Default Gateway because you going to need these later.
-
Next, you need to open your internet browser and type your Default Gateway into the address bar. This will take you to your router settings. Here your going to need your admin password. If you don't know what this is try the following:
☞ Username: admin, Password: password
☞ Checking the side of your router
☞ Go to PortForward.com
-
Now this part is different depending on what the make of your router is but you should look for something along the lines of "Port Forwarding" or "Applications And Gaming". This is where you going to port forward your Minecraft server. You should come across something that looks similar to the screenshot or a table. You will know your on the correct page because it will say 'Portocol' and 'Port Range'. For the Protocol, you must enter "Any Or Both". For the boxes for the Port you need to enter the Port for Minecraft which is 25565.
-
Finally, remember to click SAVE !
-
Now that you have successfully port forwarded, its time to set up the server its self. This is a different process depending on whether you downloaded the .exe or the .jar. To keep your server organsied, place the file in a new folder named something you would recognise (i.e. "My Minecraft Server").

Running the .exe
-
Double click on the "Minecraft_Server.exe" file you downloaded and the server should start with a default configuration.
-
Upon its initial start, it may throw some "file not found" error messages. This is normal because the files are being created.
-
After the first start, you'll probably want to shut it down (enter stop in the server command window) so you can then edit some configuration files (see bottem of page)
If you get an error such as "Can't save server.properties" and your screen fills with gibberish text, close the command prompt window and run the MinecraftServer.exe file again but this time by right clicking on it and choosing 'Run as administrator'. (You will need the administrator password to do this...)
Running the .jar
-
If you have the .jar version, you will need to have a path variable set up for Java in order to start the jar version of the server. Refer to step 3 of "REQUIRED: Verify and Install the Latest Version of Java" above to set up a path variable.
-
You need to create a new file either in Notepad (Windows) or in TextEdit (Mac) and paste in the following:
java -Xms512M -Xmx1G -jar minecraft_server.jar (add in -d64 if your server is on a 64-bit computer using 64-bit java)
Note: If your a Mac user, TextEdit needs to be in Plain Text.
-
Save the file as startserver.bat (Windows) or as start.command (Mac) and place the file in the same folder as minecraft_server.jar.
-
Double click startserver.bat or the start.command and the Minecraft server will run.
-
Upon its initial start, it may throw some "file not found" error messages. This is normal because the files are being created.
-
After the first start, you'll probably want to shut it down (enter stop in the server command window) so you can then edit some configuration files (see bottem of page)
Connecting And Configuring Your Server
For other people to connect to your you need to find out what your external IP is. You can do so by Clicking Here. Once you have your IP, you need to give it your friend but in order for them to connect you must add :25565 at the end of your IP.
-
Add your username to the admin.txt or ops.txt (newer Minecraft versions may not have an admin.txt file).
☞ Ops.txt and admin.txt determine who may execute server commands. In other words, operator ("op") privileges allow you to control certain aspects of the game (e.g., teleporting players).
-
To configure the server you edit the server.properties file. Make sure you open this file with either Notepad or TextEdit. For more info on the server.properties file Click Here.
Troubleshooting
-
On my Windows computer, when I double click the batch file it opens a command prompt window, but quickly disappears and the server does not start.
Right-click your .bat program and hit edit. Add a new line and type pause save and run the file. If it says invalid path, it is probably due to an incorrect path for javaw.exe or your server software. You may just need to change /jre7/ to /jre6/ or search your system for javaw.exe and adjust the path accordingly. (It's probably under c:\program files or c:\program files (x86) Also, you must have the 'offline version of Java' installed. (Not just the Java plug-in for your browser)
-
How do you give a .jar server more ram ?
You need to change the numbers in the server launch command the"-Xmx1G -Xms1G" (This is the startserver.bat or start.command). The -Xms part specifies how much memory the server starts with, and the -Xmx part is the maximum amount of memory the server can use. -Xmx1G -Xms2G = 1GB -Xmx2G -Xms1G = 2GB And so on.
-
I cannot break/place any blocks !?
This is most usually caused by interacting with blocks in a protected area. If you are trying to interact near spawn it is most likely that it has been protected by the minecraft server software. Either build away from it or get operator status.
-
My friend can't reach my server.
This could be caused by a series of issues. We would recommend checking your Port status first (Click Here). If your port is closed then you are not bound to the Minecraft port.
If you are a Windows, you shoud check your Firewall Settings to make sure there is an opening as this a common problem when setting up a server on a Windows computer. Once you have opened you Firewall settings, you need to check that Minecraft and your Minecraft Server is an 'Exception' or for Windows 8 users an 'Allowed App'. If it isn't then then you have discovered your issue so you will need to add both of them. Once you run your server again it should work perfectly.
If you are a Mac user and is experiencing this problem then we recommend downloading 'Port Map'. Click Here To Dowload Port Map.
-
My problem isn't listed here.
Unfortunalty, we have only listed a few frequently asked questions above but since you answer isn't listed above you should try using the following methods.
-
Check Your Server Is Bound To The Minecraft Port (25565) By Clicking Here.
-
See If You Problem Is Solved On Minecraft Wiki.
-
Post Your Question On Minecraft Forums.
-
Consult Google And/Or Youtube.